How a Refrigerator Ice Maker Actually Works
Before diving into what goes wrong, it helps to understand what is supposed to happen. A refrigerator ice maker is essentially a small automated assembly line built into your freezer. When it works correctly, the process unfolds in a repeating cycle that keeps your ice bin consistently stocked.
It begins when the water inlet valve opens for a few seconds, sending a measured amount of water through the fill tube and into the ice mold. The freezer’s cooling system drops the temperature of that water until it solidifies. A built-in thermistor monitors the mold temperature, and once the ice reaches roughly 5 to 9 degrees Fahrenheit, it signals the next phase. A heating coil briefly warms the underside of the mold just enough to loosen the cubes without melting them, and then ejector blades or a motorized arm sweeps them out of the mold and into the collection bin below.
A shut-off arm sits above the ice bin. Once enough ice accumulates and pushes the arm upward, the cycle pauses. When ice is used and the level drops, the arm falls back down, triggering a new cycle. Under normal operation, most ice makers complete a fresh batch every two to three hours.
When any single component in this chain fails or is out of spec, the entire ice-making process can stall. That is why diagnosing an ice maker correctly requires working through the system from start to finish rather than jumping straight to replacing parts.
Most Common Reasons Your Refrigerator Ice Maker Is Not Working
The Shut-Off Arm or Power Switch Is in the Wrong Position
This one sounds almost too simple, but it is responsible for a surprising number of service calls. Many ice makers have a wire shut-off arm that must be in the lowered position for the unit to run. If someone moved the arm while reaching into the freezer, or if it got nudged during a grocery load, the ice maker would stop producing ice entirely.
On models with a dedicated power switch or on-off toggle, that switch may have been accidentally turned off. Before doing anything else, check that the arm is down and the unit is switched on. On brands like Whirlpool, Maytag, and GE, this is usually the first item in the troubleshooting guide, and for good reason.
The freezer temperature is too high
Ice makers require the freezer to be within a specific temperature window to function properly. The ideal freezer temperature for ice production is between 0 and 5 degrees Fahrenheit (minus 17.8 to minus 15 degrees Celsius). When the temperature climbs above 10 degrees Fahrenheit, ice production slows dramatically. Once it reaches 15 degrees or higher, the ice maker may stop producing altogether.
A freezer that is too warm can point to a deeper issue requiring professional refrigerator repair services, such as dirty condenser coils, a malfunctioning evaporator fan, a worn door gasket, or even early compressor trouble.
On the other end, a freezer set too cold can cause ice clumps to form in the bin and cause the fill tube to freeze over, which is a separate problem covered below.
Frozen or Blocked Water Fill Tube
The fill tube is the small plastic or rubber tube that carries water from the water inlet valve into the ice mold. Because it sits inside or near the freezer wall, it is especially vulnerable to freezing. When it ices over, no water can reach the mold, and the ice maker runs through its cycle without producing anything or produces very small, hollow, or misshaped cubes.
A frozen fill tube is particularly common in Samsung French door refrigerators and LG side-by-side models, where warm humid air can enter through the door seal and freeze inside the ice maker compartment. Symptoms include hearing the ice maker motor run and the ejector arm move, but finding no new ice in the bin.
To thaw a frozen fill tube, unplug the refrigerator, remove the ice bin, and use a hair dryer set to low heat to gently warm the tube. Avoid using high heat or sharp objects. Once thawed, run a cycle to confirm water flows freely, then look into why the tube froze in the first place, whether that is a door seal issue, an airflow problem, or a freezer temperature set too low.
Clogged or Expired Water Filter
A water filter is designed to remove sediment, chlorine, minerals, and other contaminants from the water supply before it reaches the ice maker and water dispenser. Over time, the filter accumulates enough buildup that water flow becomes restricted. A severely clogged filter can reduce water pressure to the point where the ice maker receives too little water to form full cubes, or none at all.
Most manufacturers recommend replacing the water filter every six months, or sooner if you live in an area with hard water or high sediment levels. Hard water accelerates filter clogging and also leaves mineral deposits inside the water inlet valve, compounding the flow problem.
If your filter indicator light has been on for a while, or if you cannot remember the last time you changed it, that is where to start. Replacing the filter is inexpensive and takes only a few minutes. After installing a new filter, run two or three cycles to flush out trapped air and verify that ice production resumes normally.
Faulty or Clogged Water Inlet Valve
The water inlet valve is an electrically operated solenoid valve located at the back of the refrigerator where the water supply line connects. When the ice maker signals for water, this valve opens briefly to allow water to flow through. If the valve is defective, clogged with mineral scale, or not receiving the correct voltage, no water reaches the ice maker.
The minimum water pressure required for the valve to open and close correctly is around 20 PSI, with the optimal range sitting between 30 and 120 PSI. Below 20 PSI, the valve may fail to open fully, resulting in small or hollow ice cubes. Above 120 PSI, the valve can be damaged over time.
One way to test the valve without tools is to check whether the water dispenser is working. If water flows normally from the door dispenser but the ice maker receives nothing, the valve’s ice maker port may be clogged or have failed, while the dispenser port still works, since many inlet valves have separate solenoids for each function.
A humming sound coming from the back of the refrigerator when the ice maker tries to fill, but no water appears in the mold, is a classic sign of a failing water inlet valve. Replacement valves cost between $30 and $80 for most brands and can be swapped out by a handy homeowner, though confirming the diagnosis with a multimeter first is recommended.
Low Household Water Pressure
Even a fully functional water inlet valve cannot do its job if the household water pressure feeding it is too low. This is an easy thing to overlook because the water dispenser and sink may seem fine, yet still be below the pressure threshold the ice maker needs.
If you recently had plumbing work done, if your home uses a well pump system, or if you have noticed reduced flow at other fixtures, it is worth checking your home’s water pressure. A basic water pressure gauge available at any hardware store screws onto a hose bib and gives you an immediate reading. If pressure is below 20 PSI at the refrigerator’s supply line, contact a plumber before assuming any ice maker components are faulty.
Ice Clumps or Jams in the Storage Bin
Sometimes the ice maker is working perfectly, but the ice it produces is clumping together in the bin, blocking the dispenser and making it appear as though no ice is being made. This is especially common during warm months, when the freezer door opens more frequently and humid air enters.
When ice partially melts and then refreezes, it fuses into large chunks that the auger mechanism cannot break apart or push through the dispenser chute. You may hear the ice maker motor running and the dispenser struggling but dispensing nothing.
The fix is straightforward. Remove the ice bin, break up the clumps by hand or by soaking the bin briefly in warm water, then dry and return it. Going forward, try not to let ice sit unused for long periods. Using the ice dispenser regularly prevents clumping because it keeps ice cycling through before it has a chance to fuse.
Faulty Ice Maker Thermostat or Thermistor
The thermostat inside the ice maker module is responsible for detecting when the ice in the mold has reached the correct temperature to trigger the harvest cycle. If the thermostat fails, one of two things happens. Either the ice maker never receives the signal to release the ice and the mold stays frozen indefinitely, or it triggers the harvest cycle before the water has fully frozen, releasing water or partially formed cubes.
Testing the thermostat requires a multimeter to check for continuity. If it shows no continuity at the expected temperature range, the thermostat needs replacement. In many cases, replacing the entire ice maker module is more practical than replacing just the thermostat, since the parts and labor for individual component repairs often approach the cost of a complete ice maker assembly.
Control Board or Ice Maker Module Failure
Modern refrigerators from brands like Samsung, LG, Bosch, and Frigidaire rely on electronic control boards to coordinate the ice-making cycle. If the control board sends incorrect signals or fails to send any signals at all, the ice maker will not operate even when every other component is in perfect condition.
Control board issues are less common than the problems listed above, but they are more common in refrigerators that have experienced power surges. Resetting the refrigerator by unplugging it for five minutes and plugging it back in can sometimes clear a control board glitch that is preventing the ice maker from starting. Most Samsung and LG models also have a dedicated ice maker reset button, typically located on the underside of the ice maker module itself.
If a reset does not help and all other components check out, a control board replacement may be necessary. This repair is best handled by a licensed appliance technician, as misdiagnosing a control board issue and replacing it unnecessarily is an expensive mistake.
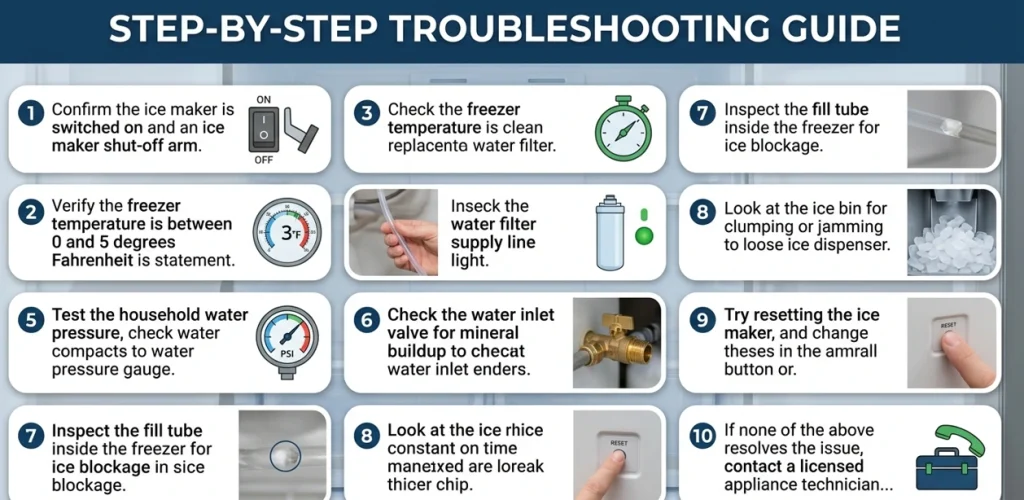
Step-by-Step Troubleshooting Guide
Working through ice maker problems in order from simplest to most complex saves time and money. Here is a logical sequence to follow.
Step 1: Confirm the ice maker is switched on. Check the shut-off arm position and any power toggle.
Step 2: Verify the freezer temperature is between 0 and 5 degrees Fahrenheit using an appliance thermometer.
Step 3: Check the water filter. If it is more than six months old or the indicator light is on, replace it before proceeding.
Step 4: Inspect the water supply line at the back of the refrigerator for kinks, bends, or blockages.
Step 5: Test the household water pressure at the supply line using a pressure gauge.
Step 6: Check the water inlet valve for mineral buildup and listen for a humming sound when the ice maker tries to cycle.
Step 7: Inspect the fill tube inside the freezer for ice blockage. Thaw it if necessary.
Step 8: Look at the ice bin for clumping or jamming that might be blocking the dispenser chute.
Step 9: Try resetting the ice maker using the reset button on the module or by unplugging the refrigerator for five minutes.
Step 10: If none of the above resolves the issue, contact a licensed appliance technician for further diagnosis, particularly of the thermostat, motor, or control board.
How to Reset Your Refrigerator Ice Maker
Resetting the ice maker is one of the quickest and most overlooked fixes. Many minor software glitches, sensor misreadings, and stuck cycles can be resolved with nothing more than a reset.
On most models, locate the reset button on the bottom or side of the ice maker module inside the freezer. Hold it down for about three seconds until you hear a chime or the module begins its test cycle. The ice maker will run through a complete cycle, which you can observe to confirm it is working.
If your model does not have a physical reset button, unplugging the refrigerator from the wall for five minutes accomplishes a full system reset. This clears any error states stored in the control board and allows the ice maker to start fresh.
After any reset, allow 24 hours before deciding whether the fix worked, since a full bin takes time to build up from an empty state.
]
Brand-Specific Ice Maker Issues Worth Knowing
Samsung
Samsung refrigerators, particularly French door and four-door flex models, have a well-documented history of ice maker problems linked to frozen fill tubes and ice buildup in the ice maker compartment. The root cause is typically inadequate airflow sealing around the ice maker housing, which allows humid freezer air to settle and freeze. Samsung has released updated ice maker components and firmware for several affected models. If your Samsung ice maker freezes repeatedly after being thawed, check whether your model is subject to a service bulletin or extended warranty.
LG
LG refrigerators with linear compressor technology sometimes experience ice maker failures tied to the compressor’s slow startup behavior in colder ambient conditions. LG’s ice makers also use a sophisticated sensor system that can malfunction after a power surge. LG offers a 10-year warranty on the linear compressor itself, but the ice maker assembly is covered separately, usually for one year under standard warranty.
Whirlpool and Maytag
These brands share many of the same internal platforms. Ice maker issues in Whirlpool and Maytag refrigerators most commonly stem from clogged water filters, low water pressure, and worn door gaskets allowing warm air infiltration. Parts availability is excellent for both brands, making DIY repair straightforward.
GE and Profile Series
GE ice maker problems frequently involve the water inlet valve failing due to mineral scale, especially in hard water regions. GE Profile and GE Cafe models use more sophisticated control systems that benefit from a full power reset when the ice maker behaves erratically.
When to Call a Professional
Many ice maker problems can be handled at home by a reasonably capable DIYer. But there are situations where professional help is the right call.
Contact a licensed appliance technician if the water inlet valve needs replacement and you are not comfortable working near the refrigerant lines and electrical connections at the back of the unit. Reach out professionally if you suspect a control board failure, as improper diagnosis leads to unnecessary parts replacement. Seek expert help if the ice maker is part of a sealed system issue connected to compressor or refrigerant problems, or if your refrigerator is still under the manufacturer’s warranty and you want to protect it.
Ice maker repair costs typically range from $75 to $400 depending on the component that needs replacement. A water inlet valve repair generally runs between $90 and $225. A complete ice maker assembly replacement sits between $150 and $350 for most residential brands. These costs are well below the price of a new refrigerator in most cases, making repair the sensible first option for units less than 10 years old.
Tips for Preventing Ice Maker Problems
Staying ahead of ice maker issues is far easier than troubleshooting them after the fact. These habits help keep the unit running reliably.
Replace the water filter on schedule. Every six months is the standard recommendation, and more frequently in areas with hard water. A fresh filter protects both the ice maker and the water inlet valve from mineral buildup.
Keep the freezer temperature in range. Temperatures that are too high or too low both cause problems. Set the freezer between 0 and 5 degrees Fahrenheit and check the actual temperature periodically with a separate thermometer.
Use the ice dispenser regularly. Ice left sitting too long in the bin clumps and jams. Dispensing ice daily keeps the bin fresh and prevents auger problems.
Inspect the door gasket annually. A worn or cracked gasket allows warm air to infiltrate, which raises the humidity inside the freezer and leads to ice clumping and fill tube freezing.
Flush the water line when replacing the filter. After every filter change, run two to three cycles’ worth of ice through and discard it. This removes any trapped air or carbon particles from the new filter and ensures clean ice production from the start.
Frequently Asked Questions
Why is my ice maker not making ice even though water is working? If the water dispenser works but the ice maker does not, the issue is likely specific to the ice maker’s water supply port in the inlet valve, a frozen fill tube, an incorrect freezer temperature, or a malfunctioning ice maker module rather than a whole-unit water supply problem.
How long does it take for an ice maker to start working again after being fixed? After a reset or repair, allow the ice maker 24 hours to resume full production. The first batch typically takes two to three hours, and a full bin can take up to a day depending on how often ice is dispensed.
Can I fix a refrigerator ice maker myself? Many of the most common fixes including filter replacement, fill tube thawing, resetting the module, and clearing ice jams can be done without professional help. Water inlet valve replacement is within reach for confident DIYers. Control board replacement and sealed system repairs should be left to certified technicians.
Why does my ice maker make ice but not dispense it? If ice is forming but not coming out, the problem is almost always a jam in the dispenser chute or an ice clump blocking the auger mechanism. Remove the ice bin, clear any blockage, and check the auger motor for resistance.
How often should a refrigerator ice maker make ice? Under normal conditions, a refrigerator ice maker completes a new batch approximately every two to three hours. The exact frequency depends on freezer temperature, water pressure, and demand.
Why are my ice cubes small or hollow? Small or hollow ice cubes point to insufficient water reaching the mold, usually caused by low water pressure, a partially clogged water filter, or a water inlet valve that is not opening fully.
Final Thoughts
A refrigerator ice maker that stops working is frustrating, but in the vast majority of cases it comes down to one of a handful of well-understood causes: a simple switch position, a clogged filter, a frozen fill tube, or a water pressure issue. Working through the troubleshooting steps in order rather than immediately ordering parts will save you both time and money.
Give each fix at least a full day to confirm whether it has resolved the problem before moving to the next step. If you reach the end of the troubleshooting process without success, a professional diagnosis is almost always worth the service fee, especially when it prevents you from replacing components that are still working fine.
Naperville Appliance Fix also provides professional refrigerator ice maker repair, freezer troubleshooting, water leak diagnostics, and same-day appliance repair services for homeowners throughout Naperville and nearby DuPage County communities
For storm damage prevention and long-term property protection, homeowners can rely on Trusted Roof Inspection Specialists in St. Louis MO for detailed inspections, fast emergency response, and professional roofing assessments.