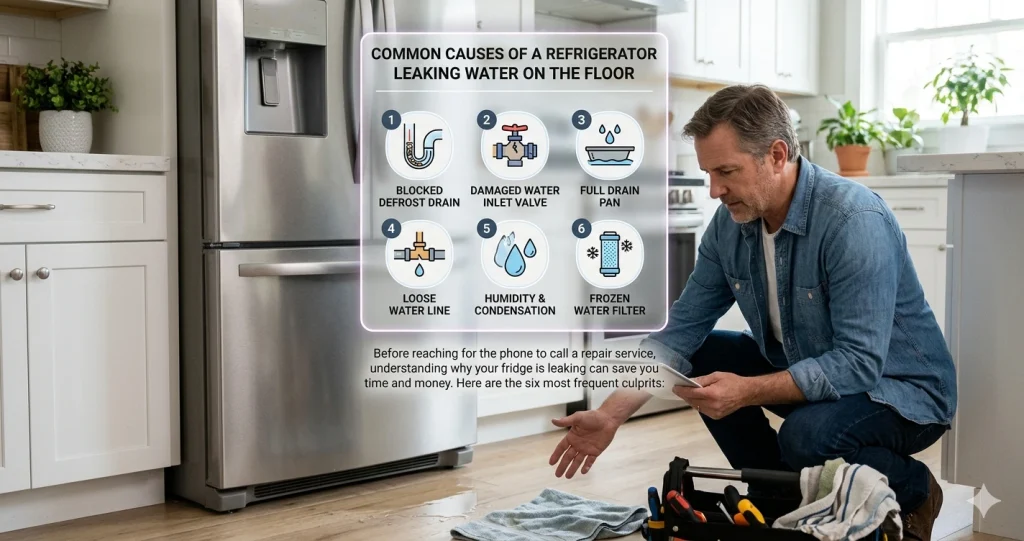
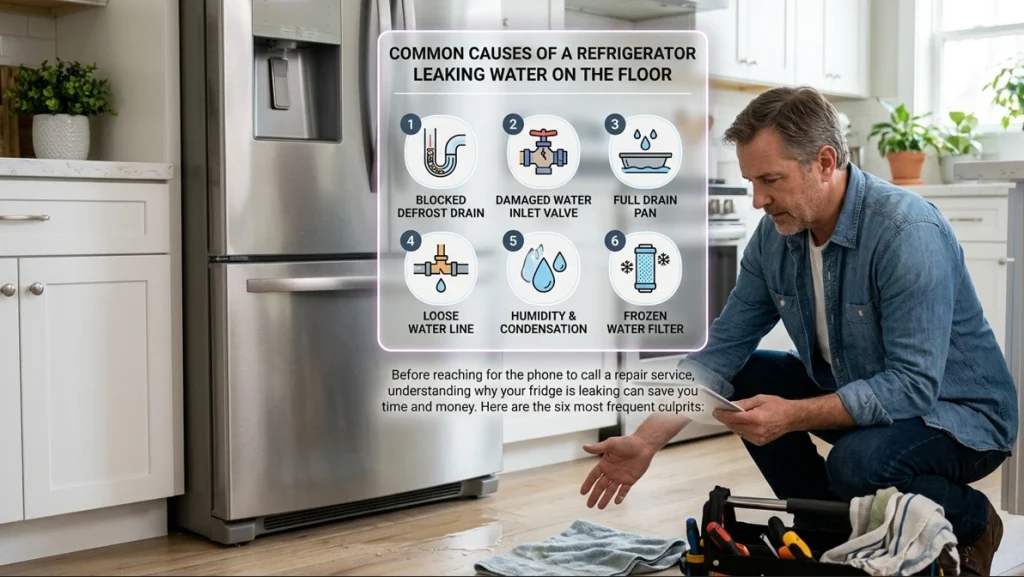
If you have walked into your kitchen and found your refrigerator leaking water on the floor, the first thing to know is that this is one of the most common appliance problems homeowners face, and in most cases it has a straightforward fix. A puddle under or around your refrigerator is never something to ignore, not just because of the slip hazard, but because standing water near electrical components and wooden flooring can cause serious secondary damage if the underlying cause is left unaddressed. This guide covers every reason a refrigerator leaks water onto the floor, how to find the source quickly, and exactly what you can do about it.
Why Locating the Source Matters Before You Do Anything Else
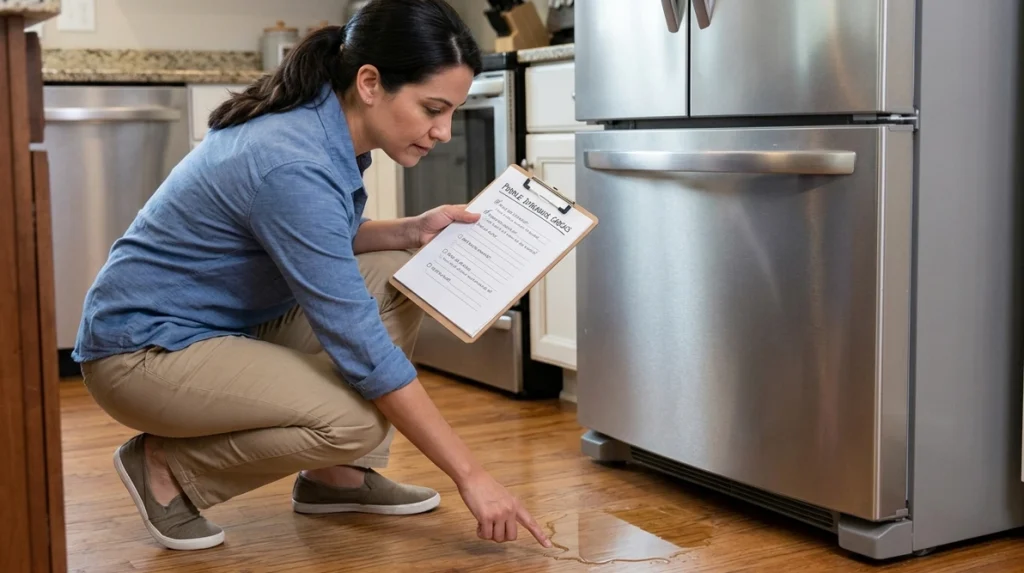
Before you start troubleshooting, take a moment to observe where the water is actually coming from. The location of the puddle and where the water appears to originate, is the fastest shortcut to identifying the cause.
Water pooling directly under the front of the refrigerator most often points to a clogged defrost drain or a cracked drain pan. Water appearing at the back of the unit near the wall is more likely coming from a loose or damaged water supply line or a faulty water inlet valve. Water appearing inside the refrigerator on the floor of the fresh food section often traces back to a clogged defrost drain overflowing internally before it reaches the floor. Water forming along the bottom door seal suggests a damaged door gasket is allowing warm humid air inside.
Always unplug the refrigerator from the power source before checking any internal components for safety. Once you have identified the general area, use the causes below to narrow it down further.
Homeowners experiencing refrigerator water leaks can benefit from professional refrigerator repair services in Naperville to quickly diagnose drainage, water line, and cooling system problems before they cause further kitchen damage.
1. Clogged or Frozen Defrost Drain
This is the single most common reason a refrigerator leaks water onto the floor, and it affects nearly every brand and model including Whirlpool, LG, Samsung, GE, Maytag, Frigidaire, KitchenAid, and Bosch.
Every refrigerator runs an automatic defrost cycle multiple times per day. During this cycle, the defrost heater melts any frost that has accumulated on the evaporator coils. That melted water is supposed to flow down a small channel called the defrost drain and into a drain pan underneath the unit, where it safely evaporates.
If the defrost drain becomes clogged or frozen, the water overflows the drain trough and drips down to the bottom of the compartment, eventually making its way onto the floor. Food particles, grease, and mineral deposits from hard water are the most common things that block a defrost drain over time. In Naperville and the surrounding DuPage County area, hard water is a well-known contributor to drain buildup because the mineral content in the local water supply leaves deposits inside drain channels and tubing.
What to do: Locate the defrost drain opening, which is typically found on the back wall inside the freezer compartment at the bottom. Use a turkey baster to flush the drain hole with warm water. If the clog does not clear, use a pipe cleaner or coat hanger to carefully break it up. Then locate the defrost drain hose and clean the attached drain valve with soap and water. If the drain freezes again within a few days, the defrost heater or defrost thermostat may need professional replacement.
2. Cracked or Misaligned Drain Pan
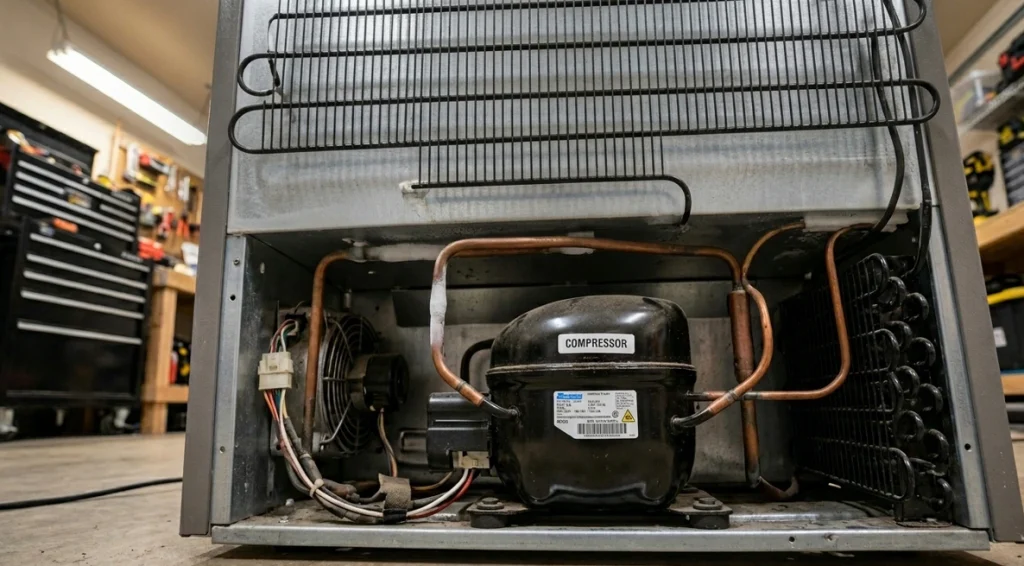
Once water flows through the defrost drain, it collects in a shallow drain pan sitting underneath the refrigerator near the compressor. Under normal circumstances, the warmth from the compressor and ambient room temperature cause that water to evaporate on its own, and the pan never needs to be manually emptied.
Although it is unusual for the drain pan to develop holes or cracks, this is a genuine cause of floor leaks that homeowners often overlook entirely because the pan is out of sight. To check it, remove the grille or kick plate from the bottom front of the refrigerator, identify the large flat pan resting in the bottom of the unit, carefully pull it out, and inspect it for damage. While the pan might have some water in it from a normal defrost cycle, it should not be overflowing or visibly cracked.
The drain pan can also shift slightly out of its correct position after the refrigerator is moved or cleaned. When it is not seated properly, water dripping from the defrost drain misses the pan entirely and lands on the floor instead.
What to do: Pull the refrigerator away from the wall and access the drain pan from the rear or remove the front grille. Check whether the pan sits flat and secure. If it is cracked, replacement pans are inexpensive and available for most models. If it is simply out of position, reseat it correctly and monitor over the next 24 hours.
3. Damaged or Loose Water Supply Line
Refrigerators with a built-in ice maker or water dispenser are connected to your home plumbing via a water supply line that runs from a shutoff valve behind the refrigerator to the water inlet valve at the back of the unit.
Water appearing under the refrigerator near the back wall is a strong indicator that something is wrong with this supply line. Low or no water pressure to the ice maker and water dispenser can also be a clue, as is water pooling on the floor and flowing toward the back of the unit rather than the front.
Plastic supply lines, which were commonly used in older refrigerator installations, become brittle over time and develop small cracks or pinhole leaks that allow water to drip continuously. Braided stainless steel lines are more durable but can still develop loose fittings at either end.
What to do: Unplug the refrigerator and pull it away from the wall. Inspect the entire length of the water supply line from the shutoff valve to the inlet valve connection at the back of the refrigerator. Look for any visible cracks, kinks, moisture along the line, or white mineral deposits that indicate a slow ongoing leak. Tighten any fittings that feel loose. If the line is cracked or visibly damaged, replace it completely. Braided stainless steel lines are the most reliable replacement option and are available at any hardware store for under $20.
4. Faulty Water Inlet Valve
The water inlet valve is a solenoid-operated component located at the back of the refrigerator near the bottom. It controls the flow of water from your home supply line into the ice maker and water dispenser. When the ice maker or dispenser calls for water, the valve opens. When the cycle is complete, it closes.
If the water inlet valve develops a crack in the valve body or a loose fitting at one of its connection points, water will leak from the valve continuously rather than only during fill cycles. A failing inlet valve can also stick in the partially open position, allowing a slow trickle of water to escape at all times. This type of leak often goes unnoticed for days or weeks because the amount of water is small at first.
What to do: Unplug the refrigerator, disconnect the water supply line, and remove the rear access panel to locate the inlet valve. Inspect the valve body for visible cracks and check all connection points for tightness and moisture. If the valve body is cracked or the solenoid is failing, the valve needs full replacement. This repair is best handled by a technician since it involves disconnecting the household water supply and accessing components at the rear of the unit.
5. Damaged Door Gasket
The door gasket is the flexible rubber seal that runs around the perimeter of both the refrigerator and freezer doors. Its purpose is to create an airtight seal that keeps cold air in and warm, humid air out.
When a door gasket cracks, tears, or warps, it no longer forms a complete seal against the refrigerator frame. Warm humid air enters the compartment every time it finds that gap, even with the door fully closed. That warm air brings moisture with it, which condenses on the cold interior surfaces and gradually accumulates at the bottom of the compartment until it finds a way out through the same gap in the gasket and onto the floor.
This problem is particularly common during hot and humid Illinois summers when the air entering the refrigerator carries a significantly higher moisture load than during cooler months.
What to do: Run your hand along the full perimeter of each closed door and feel for any air movement indicating a poor seal. Close the door on a sheet of paper and attempt to pull it out. If it slides out easily without resistance, that section of the gasket is not sealing properly. Inspect the gasket visually for cracks, tears, warping, or sections that have pulled away from the door frame. Minor distortions in a gasket can sometimes be corrected by softening it with a hair dryer on a low heat setting and pressing it back into shape. Gaskets that are cracked or torn need full replacement.
6. Cracked Water Filter Housing or Improperly Installed Filter
Refrigerators equipped with an internal water filter, which includes most modern Whirlpool, LG, Samsung, GE, and Frigidaire models, have a filter housing that can develop cracks or leaks at the seal over time.
One of the most common triggers for a water filter housing leak is an improperly installed replacement filter. If the filter is not fully seated and locked into position, it creates a gap where water can escape during fill cycles. Many homeowners replace their water filter correctly but do not push it firmly enough into the final locking position, leaving a hairline gap that produces a slow drip.
The filter head itself can also crack, particularly in older refrigerators, or the rubber O-ring seal inside the housing can dry out and fail to create a watertight connection.
What to do: Locate your water filter, which is typically found in the upper right interior of the refrigerator or in the base grille depending on the model. Remove the filter and reinstall it carefully, making sure it clicks or locks fully into place. Run the water dispenser for one minute to check for dripping at the filter housing. If the housing itself is cracked rather than just poorly seated, the housing needs professional replacement.
7. Condensation From High Indoor Humidity or an Overpacked Refrigerator
Not all refrigerator water leaks point to a broken component. In some cases the refrigerator itself is working correctly but environmental conditions or how the unit is loaded are creating excess moisture that eventually ends up on your floor.
When indoor humidity levels are high, moisture enters the refrigerator every time the door is opened. Over time that moisture builds up inside the compartment, lowers the internal temperature efficiency, and causes water to pool at the bottom of the fresh food section before leaking out through the door seal area onto the floor.
An overpacked refrigerator creates a similar problem. When items are stuffed tightly together, airflow is restricted and certain areas of the interior cannot maintain their set temperature. Warm spots form, condensation builds up, and that moisture accumulates at the bottom of the compartment until it finds a way out.
What to do: During humid summer months, minimize how often and how long you open the refrigerator door. Keep the refrigerator loaded to no more than three-quarters capacity to allow proper air circulation. If humidity in your home is consistently high, a whole-home or room dehumidifier is worth considering both for your comfort and for the long-term health of your appliances.
8. Ice Maker Fill Tube Frozen or Misaligned
The fill tube is a small plastic tube that delivers water from the inlet valve to the ice maker mold inside the freezer. If this tube freezes, water backs up and overflows rather than filling the mold correctly. That overflow often finds its way down into the refrigerator section and eventually onto the floor.
A misaligned fill tube that has shifted slightly out of position creates the same problem. Instead of directing water cleanly into the fill cup on the ice maker mold, it drips water onto surrounding surfaces inside the freezer, which then melts and travels downward.
What to do: Open the freezer and locate the fill tube, which connects to the back of the ice maker assembly. Check whether the tube appears frozen by feel or visual inspection. If frozen, unplug the refrigerator and allow the tube to thaw naturally for several hours. Confirm the tube is aimed correctly at the fill cup on the ice maker before restoring power. If the tube freezes repeatedly, the water inlet valve may be allowing a slow trickle of water to enter the tube continuously rather than only during fill cycles, which keeps the tube constantly wet and prone to refreezing.
Step by Step: How to Find the Leak Quickly
Work through these checks in order before calling a technician:
Step 1: Identify exactly where the puddle forms. Front of the unit, underneath at the back, or inside the refrigerator section itself.
Step 2: Check the defrost drain inside the freezer for blockage or ice buildup and flush it with warm water.
Step 3: Pull the refrigerator forward and inspect the drain pan for cracks and proper seating.
Step 4: Examine the water supply line from wall to refrigerator for cracks, kinks, and loose fittings.
Step 5: Remove and reinstall the water filter to confirm it is fully seated. Inspect the filter housing for cracks.
Step 6: Inspect the door gasket on both the refrigerator and freezer doors for tears, warping, or gaps.
Step 7: Check the ice maker fill tube for freezing or misalignment.
Step 8: If none of the above checks reveals the source, schedule a service call with a Naperville appliance repair technician for professional diagnosis.
Is a Leaking Refrigerator Dangerous?
Yes, in several ways. Water on a kitchen floor is a genuine slip-and-fall hazard, particularly on tile or hardwood surfaces. Prolonged water exposure damages hardwood floors, causes tile grout to deteriorate, and can create conditions favorable for mold growth under flooring and behind baseboards. Water near the compressor and electrical connections at the back of the refrigerator presents an electrical hazard if the leak is significant enough.
Address a refrigerator leak the same day you discover it rather than placing a towel under the unit and dealing with it later. What starts as a minor drip from a clogged drain can quietly damage your flooring for weeks before you realize the scope of the problem.
Repair Cost Estimates for Naperville Homeowners
Clearing a clogged defrost drain is something most homeowners can do themselves at no cost. A technician performing this as part of a service call typically charges around $75 to $150.
Replacing a drain pan costs between $20 and $60 for parts and is a DIY-friendly repair on most models.
Replacing a water supply line runs $20 to $50 for parts if you do it yourself, or $75 to $150 with professional installation.
Water inlet valve replacement typically costs between $100 and $200 including parts and labor.
Door gasket replacement runs between $50 and $200 depending on the brand and model.
Water filter housing replacement varies by model and typically falls between $75 and $175 installed.
As a general guideline, most refrigerator leak repairs fall on the lower end of the overall repair cost spectrum. A leak that is caught and addressed quickly rarely requires more than one or two components.
When to Call a Naperville Appliance Repair Technician
These situations call for professional help rather than DIY troubleshooting:
The water inlet valve needs replacement. This involves disconnecting the household water supply and accessing sealed components at the rear of the unit.
The defrost drain keeps refreezing after you clear it, which indicates a component failure in the defrost heater or defrost thermostat that needs testing and replacement.
The water filter housing is cracked and needs replacement.
You cannot identify the source of the leak after completing all the checks above.
The leak appears to be coming from refrigerant tubing or anywhere near the sealed cooling system, which requires a certified technician with proper equipment.
Naperville Appliance Fix serves homeowners throughout Naperville, Aurora, Bolingbrook, Downers Grove, Lisle, Wheaton, and surrounding DuPage and Will County communities. Most refrigerator leak diagnoses can be completed on the first visit, and common repair parts are typically carried on the service vehicle for same-day resolution. When you need dependable Naperville appliance repair, our team is equipped to handle the job quickly and efficiently
Homeowners searching for Fast & Reliable Appliance Repair Services in Fargo, ND can benefit from professional refrigerator leak diagnosis and same-day appliance repair solutions for all major household appliance brands.